
Outline & Structure
Most fiction writers have a complicated relationship with outlines. Some swear by them and plan every chapter in obsessive detail before writing a single sentence of prose. Some refuse to outline at all and claim it kills the magic. Most of us are somewhere in the middle — we want enough structure to know roughly where the book is going and enough flexibility to let the story surprise us as we write. Ishvana’s outline system is built for the middle ground. You can use it as lightly as a single list of chapter titles, or as heavily as a seven-level hierarchy that breaks every scene into individual beats and cross-references every entity in every scene against every other. The system supports both ends and everything in between, and the view modes let you look at the same underlying data through four different lenses depending on what you need to see at the moment.
This page walks through the whole outline system — the seven node types, the four views, POV tracking, document linking, and the legend integration that makes the outline feel like a project dashboard for a single book.
Seven node types
Section titled “Seven node types”The hierarchy has seven levels of structural granularity, from biggest to smallest:
- Series — a multi-book collection. A trilogy, a saga, a long-running series with shared lore.
- Book — a single novel or volume.
- Part — a major division within a book (“Part One: The Beginning”). Not every book uses parts.
- Act — a narrative act, if you’re using a three-act, five-act, or other act-based structure. Some books use acts, some don’t.
- Chapter — a standard chapter.
- Scene — an individual scene within a chapter. Most books have multiple scenes per chapter.
- Beat — the smallest narrative unit. A single moment, a turning point, a specific beat within a scene.
When you add a child node, the system auto-suggests the appropriate next level — books create chapters, chapters create scenes, scenes create beats. You can always override the suggestion if your book doesn’t follow the conventional structure. Not every book uses every level; most projects only use three or four of the seven.
Four view modes
Section titled “Four view modes”The four view modes all show the same underlying data — same nodes, same metadata, same word counts — but they show it in radically different ways. Each view is good for a different kind of question, and switching between them is the most useful outline habit to develop.
The default tree view. A collapsible sidebar shows the full outline hierarchy. Selecting a node opens a detail panel on the right with everything that node carries:
- Title, summary, notes. Editable fields. The summary is for a one-paragraph description of the node; the notes field is for freeform scratch content.
- Node type and status. Change either from the selectors.
- Word count target. Set an expected word count for this node. Used by Desktop’s completion tracking.
- POV type and POV character. For scene and beat nodes, assign the narrator’s perspective.
- Linked document. If the node is linked to a manuscript, the linked document appears with a live progress bar showing current words vs. target.
- Children list. Direct children of this node with their own word counts and status indicators.
- Aggregate word count. Total words across all linked descendant documents, rolled up to this node.
Detail view is where you spend the most time when you’re actively editing the outline itself. Adding nodes, renaming them, changing statuses, setting POV, linking documents.
A card-based layout organized by chapter. Scenes and beats appear as cards grouped under their parent chapter or act headers.
- Card size — small, medium, large, or wide. Pick based on how much detail you want visible at once.
- Grid axis — vertical scroll or horizontal scroll. Horizontal is more cinematic; vertical is more traditional.
- Zoom slider — 50% to 150%. Zoom out to see the whole book; zoom in to see scene summaries at readable size.
- Status colors on each card so you can see draft vs. done distribution at a glance.
- POV character display on each card so you can see who’s narrating where.
- Context menu for status changes, detail view, and deletion.
Grid view is the best view for answering “what’s the overall shape of this book?” You see every scene at once, color-coded by status, with POV characters visible. Useful when you’re trying to decide whether a book has enough scenes from a specific character’s perspective, or whether the pacing is getting stuck in one act.
A linear, reading-order view that flattens the tree into a single scrollable list. Act, part, and book headers appear as section dividers. Chapter headers display their word count targets. Scene and beat cards show summaries and entity references.
Click any item to jump to its detail view.
Reading view is the closest Ishvana gets to seeing the outline the way a reader would experience the book. It’s useful for pre-flight checks before you start drafting — “does the order of these scenes actually make sense if I read them top to bottom?”
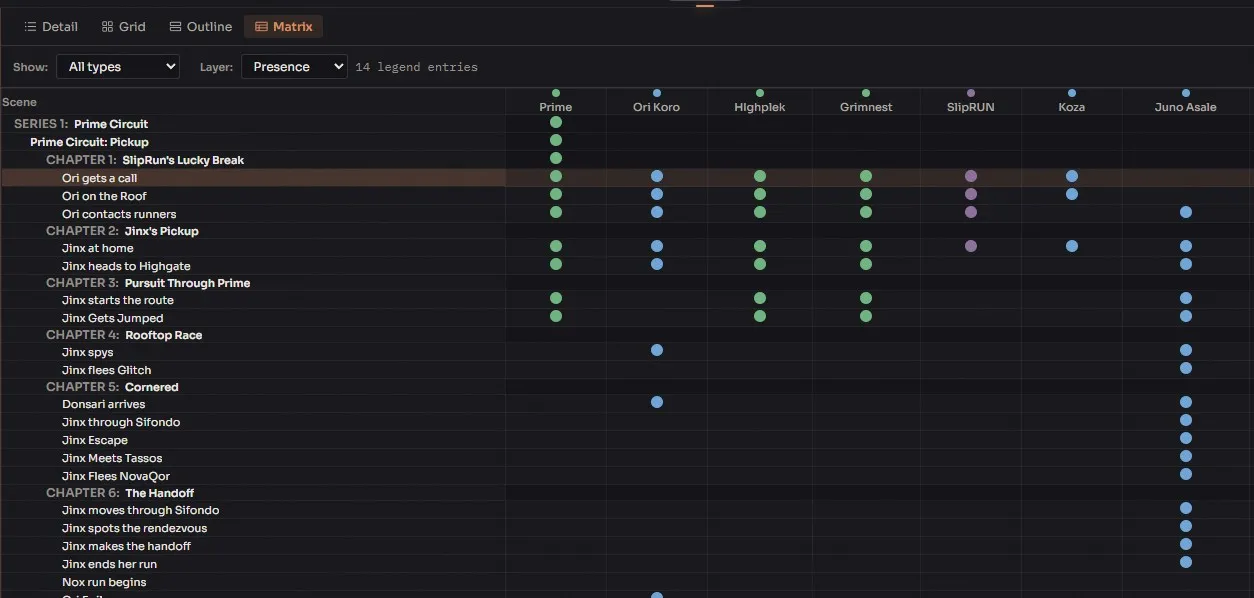
An entity-by-scene cross-reference table. Rows are outline nodes (indented to show hierarchy). Columns are entities. A filled cell means that entity appears in that scene.
- Filter by entity type: character, location, organization, item, concept, or all.
- Click any row to jump to the detail view for that node.
- Color-coded entity type indicators across the columns.
Matrix view is the least common view to use day-to-day but the most useful when you need it. It answers questions like “which character disappears for the middle third of the book?” or “does this faction show up in enough scenes to matter?” or “is this subplot actually getting page time?” Nothing else in Ishvana shows you structural coverage this clearly.
Your selected view mode persists between sessions. Switch once and it stays switched.
Status tracking
Section titled “Status tracking”Every node has one of four statuses:
- Draft — initial state, nothing’s been written yet or very little.
- In Progress — actively being worked on.
- Revision — under revision pass.
- Done — completed.
Set the status from the detail panel or via the right-click context menu. Statuses show up as colored indicators in Grid view and in the document sidebar, so you can tell at a glance which parts of your book are where in the process.
Status matters for Desktop’s completion tracking too — outline-status is one of the six dimensions in the default completion formula, and “nodes marked Done” is literally what that dimension measures.
POV assignment
Section titled “POV assignment”Scene and beat nodes support point-of-view configuration. Structural nodes (series, book, part, act) don’t show POV options because POV is a scene-level concern, not a structural one.
Nine POV types
Section titled “Nine POV types”- 1st Person — standard first-person.
- 2nd Person — the rarest. Used deliberately.
- 3rd Limited — third person tied to a single character’s interior.
- 3rd Omniscient — third person with access to multiple characters’ thoughts.
- 3rd Objective — third person with no interior access at all.
- Multiple 1st — several first-person narrators across the book.
- Deep 3rd — tight third-limited with almost-first-person intimacy.
- Stream of Consciousness — unbroken interior monologue.
- Unreliable Narrator — any POV type flagged as unreliable.
POV character
Section titled “POV character”Assign a specific character from your Legendry as the POV character using the entity picker. This matters more than it looks — when Hawken gives you feedback on a scene or sketches a rough draft of one, it uses the POV character to shape voice, interior reasoning, and what the narration can and can’t know. The POV character link also feeds the Matrix view so you can see which characters are carrying which scenes.
Document linking
Section titled “Document linking”Chapters, scenes, and beats can be linked to manuscript documents:
- Create & Link — creates a new blank document with the node’s title and links it automatically.
- Link Existing — opens a picker to select an existing document.
- Unlink — removes the association without deleting the document.
- Open in Editor — navigates to the linked document.
When a word count target is set on the outline node, a progress bar shows current words versus target for the linked document. Progress bars on individual nodes roll up into aggregate progress on parent nodes, so a chapter node shows the total word count across all its linked scene documents.
Entity references
Section titled “Entity references”Track which entities from your Legendry appear in each scene:
- Manual entities. Add via the entity picker in the detail panel. Useful for entities that should be in a scene but haven’t shown up in prose yet.
- Auto-detected entities. Detected from linked document content. Toggleable — some authors prefer manual tracking only.
- Entity references appear in Grid, Reading, and Matrix views.
- The Matrix view is the clearest cross-reference — one glance tells you which entities show up where.
Drag and drop
Section titled “Drag and drop”Drag outline nodes in the sidebar to reorder or reparent them. Drop zones indicate where the node will land: above (reorder before), below (reorder after), or inside (reparent as child). Dragging a chapter onto a different book moves the chapter to that book. Dragging a scene above another scene reorders them within the same chapter.
This is the main way you restructure an outline once it exists. You don’t edit position values or drag handles — you just grab nodes and drop them where they belong.
Inline rename
Section titled “Inline rename”Right-click a node and select Rename (or press F2) to enter inline rename mode. Press Enter to confirm, Escape to cancel. Newly created nodes auto-enter rename mode so you can name them immediately.
Book scope
Section titled “Book scope”A dropdown at the top of the sidebar lets you scope the view to a specific series or book. Select “All” to see the entire outline tree. Scope to a single book when you’re doing focused work on one title and don’t want other books cluttering the view.
Legend integration
Section titled “Legend integration”The outline module includes a Legend panel — a book or series-scoped lore system that lives alongside the outline. It’s a scaled-down Legendry specific to the current book, with three view levels:
- All — shows series-level and book-level entries together.
- Series only — shows only entries scoped to the whole series.
- Book only — shows only entries scoped to this specific book.
Operations:
- Pull from Legendry — import existing Legendry entries into the book’s Legend scope so they show up in the outline context.
- Create inline — create lightweight lore entries scoped to the current book or series directly from the outline.
- Promote — upgrade an inline Legend entry to a full Legendry entry when it graduates from book-specific to project-wide.
- Search and filter by title, description, type, or tags.
- Entries group by category.
The Legend panel exists so you don’t have to jump between the outline and the full Legendry every time you need to reference a character. The most frequently-used entries for the current book live right next to the outline.
Export
Section titled “Export”Export the current book or series outline as a document:
- Format — DOCX or PDF.
- Include TOC — optional table of contents.
- Include summaries — include each node’s summary text in the exported document.
Useful for planning documents you want to share with a beta reader, a collaborator, or an editor before the prose is ready.